Table of Contents
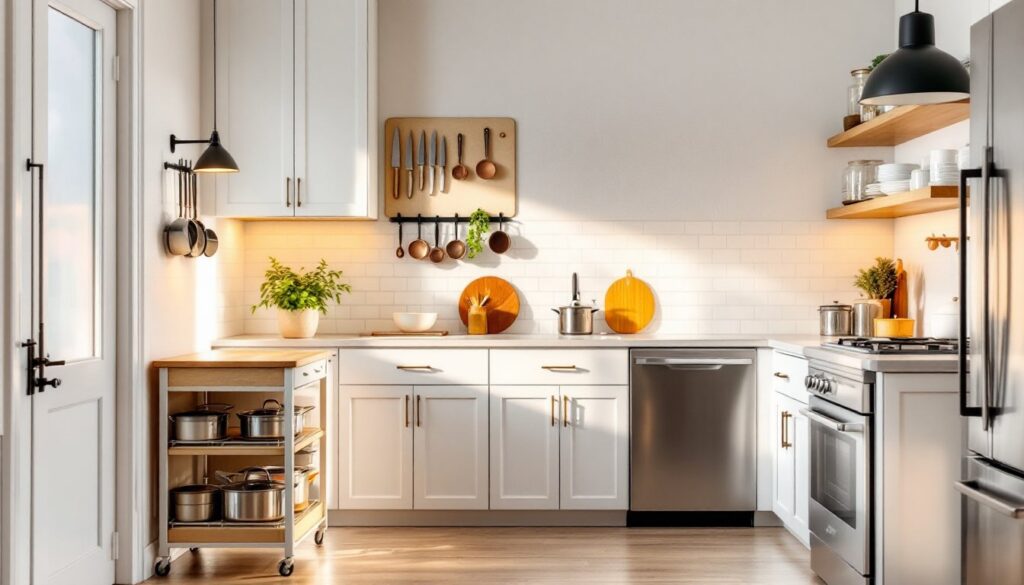
ToggleSmall kitchens don’t have to feel cramped or chaotic. With the right approach, even a galley kitchen or compact corner can work harder, store smarter, and look better than spaces twice its size. The key isn’t square footage, it’s strategic design choices that eliminate wasted space and make every inch earn its keep. This guide walks through proven tactics for storage, layout, color, and multi-functional gear that transform tight cooking spaces into efficient, enjoyable work zones.
Key Takeaways
- Floor-to-ceiling cabinets and pull-out organizers add 50% more storage by reclaiming vertical space and dead zones that waste square footage in small kitchens.
- Kitchen ideas for small kitchens thrive with strategic layout optimization—keep the work triangle between sink, stove, and refrigerator within 12–26 feet and use galley or L-shaped designs to maximize efficiency.
- Light colors, glass-front cabinets, and LED under-cabinet lighting visually enlarge small spaces and eliminate shadows that make compact kitchens feel cramped.
- Multi-functional appliances like combination microwave-convection ovens and compact 18-inch dishwashers eliminate the need for separate units and free up valuable counter space.
- Budget-friendly DIY updates such as cabinet painting ($100–200) and peel-and-stick backsplash tiles deliver high impact without professional contractors or major renovations.
Smart Storage Solutions That Double Your Space
Most small kitchens suffer from poor storage, not lack of it. The fix starts with claiming vertical space and dead zones.
Install floor-to-ceiling cabinets instead of standard 30-inch uppers. Upper cabinets that reach the ceiling add 50% more storage and eliminate dust-catching gaps. Use the top shelves for items you don’t need daily, holiday serveware, specialty appliances, bulk storage.
Pull-out organizers inside lower cabinets reclaim the back corners where pots and pans go to die. A two-tier pull-out shelf in a 24-inch base cabinet can hold 40% more than fixed shelves. Look for soft-close glides rated for at least 75 pounds.
Drawer dividers keep utensils, spices, and tools from turning into junk piles. Custom dividers (wood or acrylic) fit better than universal inserts and stay put when you open the drawer. Size them to your actual gear, most silverware trays waste half their footprint on unused slots.
Toe-kick drawers use the 3-4 inch recess under base cabinets. They’re shallow but perfect for baking sheets, cutting boards, or flat lids. Installation requires removing the existing toe-kick board and adding a custom drawer box with low-profile glides.
Vertical Storage and Wall-Mounted Options
Magnetic knife strips free up counter and drawer space. Mount them 6 inches below eye level for safe, easy access. Use neodymium magnets if your knives are heavy (over 8 ounces).
Pegboard walls adapt to changing needs. Paint them to match your walls or go with natural wood for warmth. Use 1/4-inch pegboard with metal hooks rated for the weight you’re hanging, cheap plastic pegs sag under cast iron.
Open shelving works when done right. Install floating shelves with concealed brackets rated for at least 50 pounds per linear foot. Keep shelves 12-15 inches deep, any shallower and dinner plates hang over the edge. Declutter regularly or open shelves become open messes.
Wall-mounted dish racks over the sink turn dead wall space into drying and storage. Look for stainless steel models with drip trays and adjustable tiers. Check that your wall can support the weight, use toggle bolts or hit studs directly.
Layout and Design Tricks to Make Your Kitchen Feel Larger
Layout determines how efficient a small kitchen feels. Smart positioning beats more square footage.
Optimize the work triangle between sink, stove, and refrigerator. Total distance should be 12-26 feet for efficiency. In tight galley kitchens, a two-point layout (sink and stove on one side, refrigerator opposite) works better than forcing a triangle.
Use a galley or L-shaped layout for compact spaces. Galley kitchens (two parallel walls) maximize efficiency in narrow rooms but need at least 42 inches between counters for comfortable traffic. L-shaped kitchen layouts keep everything within reach without blocking flow.
Eliminate the kitchen table if space is tight. A 12-inch deep wall-mounted drop-leaf table or fold-down breakfast bar provides dining without permanent floor space loss. Mount it at 30 inches high with heavy-duty folding brackets rated for 200+ pounds.
Extend countertops over appliances where possible. A counter that overhangs the dishwasher or washer by 1-2 inches creates visual continuity and usable surface. Check appliance manuals for clearance requirements first, some need ventilation space.
Pocket doors or barn doors save the 9 square feet a swinging door needs. Pocket door hardware requires a 2×4 wall cavity (or thicker), so they’re easier in new construction. Barn doors work on any wall but project 2 inches into the room when closed.
Color Schemes and Lighting That Open Up Small Spaces
Light and color manipulate perceived size more than most physical changes.
White or light-colored cabinets reflect light and visually recede. Warm whites (with cream or beige undertones) feel less clinical than stark white. Semi-gloss or satin finishes bounce more light than flat paint but show fewer fingerprints than high-gloss.
Match wall and cabinet colors for a monochromatic look that erases visual boundaries. A minimalist kitchen uses a single neutral palette to create flow. Break it up with natural wood, metal hardware, or a single accent color to avoid sterility.
Use glass-front cabinets on upper units to add depth. Display only matching or coordinated items, mismatched mugs look cluttered behind glass. Frameless glass doors feel more modern: traditional raised-panel frames suit classic styles.
Install under-cabinet LED strips to eliminate shadows and make counters feel more spacious. Color temperature matters: 2700K feels warm and cozy: 3000K is neutral: 4000K+ is bright white suitable for task lighting. Mount strips at the front edge of cabinets, not the back, to reduce glare on polished countertops.
Add recessed ceiling lights on a 4-foot grid to eliminate dark corners. In kitchens with 8-foot ceilings, use 4-inch retrofit cans with 650-800 lumen LED bulbs. According to Apartment Therapy, small kitchens need roughly 50 lumens per square foot for adequate ambient lighting.
Pendant lights over an island or bar draw the eye vertically and define zones without walls. Hang them 30-36 inches above the counter surface. Choose fixtures 12-18 inches in diameter for standard 24-inch deep counters.
Multi-Functional Furniture and Appliances for Compact Kitchens
Every piece in a small kitchen should do at least two jobs.
Rolling kitchen carts add counter space, storage, and mobility. Look for carts with butcher block or stainless steel tops that can handle food prep. Locking casters prevent unwanted movement when you’re chopping. Store it against a wall or slide it under a counter overhang when not in use.
Combination microwave-convection ovens eliminate the need for a separate microwave and can roast, bake, or air fry. They’re 25-30% slower than dedicated convection ovens but save significant counter or cabinet space. Vent them properly, most need 3 inches of clearance on all sides.
Compact dishwashers (18 inches wide) fit where full-size units can’t. They hold 6-8 place settings versus 12-14, which works fine for 1-3 people. Efficiency is comparable, look for Energy Star models using around 3 gallons per load.
Slide-in ranges eliminate the gap between range and counter, creating a cleaner look and extra usable surface. They cost 15-25% more than freestanding ranges but the integrated appearance makes small kitchens feel more intentional. Confirm your counter depth, most slide-ins need 25-inch deep counters.
Apartment-size appliances (20-24 inches wide) suit tiny house kitchens or serious space constraints. Refrigerators, ranges, and dishwashers all come in narrower versions. Expect 30-40% less capacity and slightly higher per-cubic-foot costs.
Fold-down drying racks mounted over the sink or on cabinet doors keep dishes off the counter. Stainless steel models last longer than plastic and support heavier cookware. Check door hinges before mounting racks, older cabinets may need hinge reinforcement.
Budget-Friendly DIY Updates to Transform Your Small Kitchen
Big impact doesn’t require big budgets or contractor-level skills.
Paint existing cabinets instead of replacing them. Clean thoroughly with TSP (trisodium phosphate), lightly sand with 220-grit paper, prime with bonding primer, and apply two coats of cabinet-grade paint. Total cost: $100-200 for an average small kitchen. Expect a full weekend for prep, prime, and painting.
Replace cabinet hardware for instant modernization. Knobs run $2-8 each: pulls $3-12. Measure hole spacing (center-to-center distance) before buying. Switching from knobs to pulls often requires drilling new holes, use a template to keep spacing consistent.
Install peel-and-stick backsplash tiles for a DIY-friendly update. Quality vinyl or gel tiles cost $8-15 per square foot and require only scissors and a level. They’re removable but less durable than ceramic, expect 3-5 years in rental or temporary situations. Real tile (ceramic or porcelain) lasts 15+ years but requires a wet saw, mortar, grout, and more skill.
Add a fresh coat of paint in a light, neutral color. Use washable paint (eggshell or satin finish) rated for kitchens and bathrooms. One gallon covers roughly 350-400 square feet and costs $30-45 for quality brands like Benjamin Moore or Sherwin-Williams.
Upgrade to LED bulbs in existing fixtures for better light at lower cost. Switching ten 60-watt incandescent bulbs to 9-watt LEDs saves around $80 per year in electricity. LEDs last 15,000-25,000 hours versus 1,000 for incandescents. The Kitchn recommends 2700-3000K color temperature for warm, inviting ambiance.
Install vinyl plank flooring over existing floors (if level and sound). Luxury vinyl plank (LVP) costs $2-5 per square foot and clicks together without glue or nails. It’s waterproof, durable, and realistic-looking. A 100-square-foot kitchen takes one person about 6-8 hours. Trim baseboards or add quarter-round to cover expansion gaps.
Conclusion
Small kitchens reward the homeowner who thinks vertically, eliminates single-function items, and chooses finishes that reflect light. Start with storage solutions that reclaim wasted space, choose a layout that shortens unnecessary steps, and finish with colors and lighting that trick the eye into seeing more room. The best small kitchen isn’t the one that hides its size, it’s the one that works so efficiently you stop noticing.