Table of Contents
ToggleA backyard shouldn’t sit empty while everyone crowds around screens inside. With a few smart upgrades and DIY projects, any outdoor space, whether it’s a sprawling lawn or a modest patio, can become the go-to destination for family time, weekend hangouts, and seasonal entertaining. The best part? Most of these projects require minimal tools, modest budgets, and zero professional help. From oversized lawn games to simple water features, transforming a backyard into an activity hub is more about creativity than cash. Here are over 25 practical ideas that deliver real fun without the lifestyle fluff.
Key Takeaways
- Backyard fun ideas range from DIY lawn games like oversized Jenga and cornhole to outdoor movies, water features, and fire pits—all achievable with minimal tools and modest budgets.
- Building custom outdoor games costs significantly less than premade versions and allows you to customize designs to fit your specific space and needs.
- Water activities such as splash pads, stock tank pools, and slip-and-slides provide affordable cooling solutions without requiring permanent plumbing or professional installation.
- Proper foundation work, such as leveling ground for patios and using correct soil layers, prevents settling and ensures long-lasting outdoor entertaining spaces.
- Fire pit safety depends on checking local codes, maintaining proper distance from structures, seasoning hardwood for 6-12 months, and keeping fire extinguishers nearby.
- Nature-focused backyard projects like butterfly gardens, raised vegetable beds, and bug hotels combine learning opportunities with ecosystem support while reducing screen time.
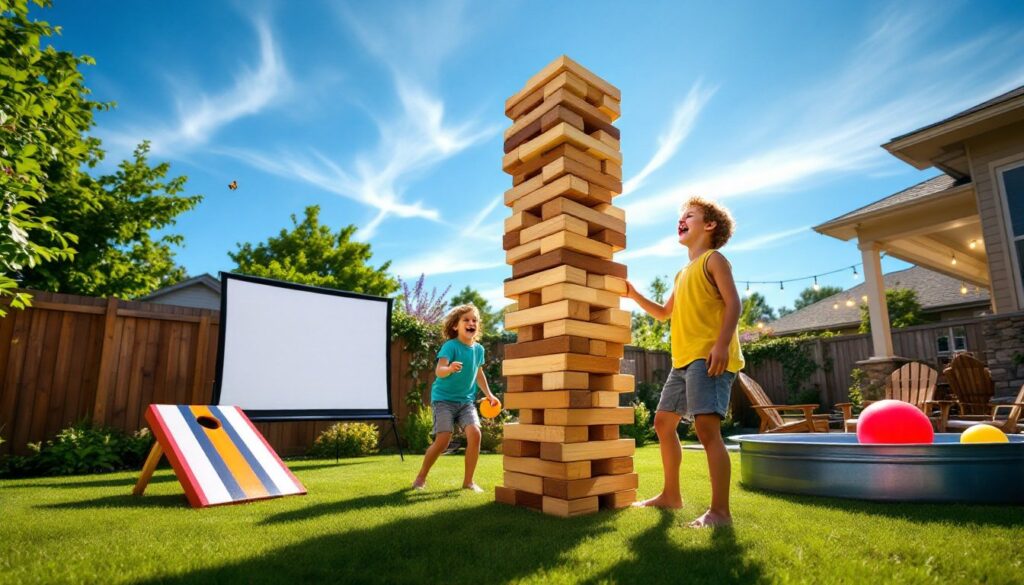
DIY Outdoor Games for All Ages
Building outdoor games from scratch costs less than buying premade versions and allows customization for the space. Most projects require basic carpentry skills and common lumber.
Giant Lawn Games
Oversized Jenga is a weekend-friendly build. Use 2×4 nominal lumber (actual dimensions 1.5″ × 3.5″), cut into 54 blocks at 10.5″ each. Sand all edges smooth with 120-grit paper to prevent splinters, skipping this step ruins the playability. Stack them in alternating rows of three. Total material cost runs $40-60 depending on lumber prices.
Cornhole boards require one sheet of 3/4″ plywood, cut into two 24″ × 48″ rectangles. Frame each with 2×4s, creating a slope by adjusting leg heights: front legs at 4″, rear at 12″. Drill a 6″ diameter hole centered 9″ from the top edge. Prime and paint with exterior-grade products: a gallon covers both boards with leftovers. Bean bags can be sewn from canvas duck cloth and filled with feed corn.
Giant Connect Four stands vertically and impresses guests. Build a frame from 1×6 boards (actual 3/4″ × 5.5″) arranged in a 7×6 grid pattern. Drill 3.5″ holes through each space, spacing them evenly. Use red and yellow plastic plates as game pieces, cheaper than wood and weather-resistant. Mount the frame on a sturdy base or stake it into the ground.
Ring toss stakes can be made from 1″ diameter dowels or 3/4″ PVC pipe, cut to 18-24″ lengths. Hammer into the ground or mount in weighted bases made from 5-gallon buckets filled with concrete. Rings come from 6″ embroidery hoops wrapped in colored tape.
Create a Backyard Movie Theater Experience
An outdoor movie setup requires four components: a screen, projector, audio, and seating. None require permanent installation.
For the screen, stretch a white bedsheet taut between two trees or posts. For better image quality, build a PVC frame using 1″ schedule 40 pipe: create a rectangle (common sizes: 8′ × 6′ or 10′ × 8′) and clamp blackout cloth or a purpose-built projection screen to it. The frame breaks down for storage.
Projectors rated at 3,000+ lumens work for dusk viewing: lower ratings require full darkness. Position the projector 10-15 feet from the screen for an 8-foot image, adjusting based on the lens specs. Run extension cords to outdoor-rated outlets or use a portable power station.
Sound matters more than most people think. Built-in projector speakers don’t cut it outdoors. A portable Bluetooth speaker (50+ watts) works for small groups, but serious setups benefit from a dedicated outdoor entertainment area with wired speakers. Place speakers on either side of the screen at ear height when seated.
Seating options range from lawn chairs to pallet sofas. Build the latter from heat-treated pallets (marked HT, not MB, methyl bromide-treated pallets are toxic). Stack two pallets, secure with 3″ deck screws, and top with outdoor cushions. Add side tables from cinder blocks and salvaged wood planks.
Don’t forget bug control. Citronella candles provide minimal relief: oscillating fans aimed at seating areas work better by disrupting mosquito flight patterns.
Water Activities to Beat the Heat
Water features don’t require in-ground pools or major plumbing work. Most connect to standard garden hoses and drain into existing landscape beds.
DIY splash pads start with a soaker hose or drilled PVC pipe arranged in a circle or grid pattern. Cap one end, connect the other to a hose, and let kids run through the spray. For contained splash zones, dig a shallow depression 6″ deep, line with landscape fabric, fill with pea gravel, and run the spray system above it. Water drains through the gravel instead of creating mud puddles.
Stock tank pools have become popular for good reason, they’re affordable ($200-400) and install in an afternoon. Choose galvanized metal tanks in 6-8 foot diameters. Level the ground first: even a 2° slope stresses the tank walls. Set the tank on a bed of sand or decomposed granite 2-4″ deep. Fill, add a small submersible pump for circulation, and use pool shock tablets to keep water clean. These aren’t heated, so expect cold plunges.
A slip-and-slide improves dramatically with proper prep. According to Southern Living, lay heavy-duty plastic sheeting (6 mil thickness) over a 25-30 foot run of flat lawn, removing sticks and rocks first, they’ll puncture through and bruise riders. Anchor edges with landscape staples. Run a soaker hose or drilled PVC the length of one side. Add a few drops of tear-free shampoo to the water stream for extra slickness (dish soap causes skin irritation).
Water balloon stations eliminate the tedious filling process. Multi-nozzle fillers attach to hoses and fill 30+ balloons per minute. Set up a filling station near an outdoor spigot with buckets for transport.
Build a Cozy Fire Pit Gathering Space
Fire pits require planning before building. Check local codes first, many jurisdictions restrict open flames, require minimum distances from structures (commonly 25 feet from buildings, 10 feet from property lines), or mandate spark screens.
For a permanent in-ground pit, mark a 4-5 foot diameter circle, dig 12″ deep, and fill the base with 4-6″ of gravel for drainage. Build walls with firebrick or concrete retaining wall blocks, setting them in a circular pattern without mortar (allows drainage and easier reconfiguration). Line the interior with a steel fire ring ($40-80) to protect the masonry and contain embers.
Above-ground portable pits work better for renters or those wanting flexibility. Build one from a galvanized steel wheel rim (tractor or truck size) set on concrete pavers or a gravel bed. Drill 1/2″ drainage holes in the bottom. The metal will rust over time, that’s normal and doesn’t affect function.
Seating placement matters for comfort. Position chairs 6-8 feet from the pit edge, closer causes excessive heat, farther loses the cozy factor. Creating a simple backyard hangout around the fire pit includes built-in benches from landscape timbers or concrete blocks topped with 2×10 cedar or pressure-treated boards.
Fuel choice affects burn quality. Hardwoods (oak, maple, hickory) burn longer and cleaner than softwoods. Season wood for 6-12 months before burning: green wood produces excess smoke and creosote. Split logs to 3-6″ diameter for optimal burning. Never burn pressure-treated lumber, painted wood, or plywood, they release toxic fumes.
Safety gear: Keep a fire extinguisher (10-lb ABC rated) within 10 feet. A bucket of sand also works for small flare-ups. Always fully extinguish fires before leaving, drown with water, stir ashes, repeat until cool to touch.
Nature Exploration and Garden Projects
Backyards offer hands-on learning opportunities that beat any screen time. These projects work whether the space is a quarter-acre or a compact city lot.
Butterfly gardens attract pollinators with specific plant choices. Include native milkweed species (monarchs won’t breed without it), purple coneflower, black-eyed Susans, and bee balm. Plant in clusters rather than single specimens, butterflies spot large color patches more easily. Skip pesticides entirely: they defeat the purpose. Add a shallow dish filled with sand and water as a puddling station where butterflies absorb minerals.
Raised bed vegetable gardens teach patience and biology. Build boxes from untreated cedar or composite lumber (avoid pressure-treated for edibles, older formulations contain arsenic). Standard dimensions: 4′ × 8′ × 12″ tall. Fill with a mix of 40% topsoil, 40% compost, and 20% perlite or vermiculite. That ratio provides drainage without drying out too fast. Start kids with fast-growing crops: radishes (25 days), lettuce (30 days), and bush beans (50 days).
Bug hotels support beneficial insects. Stack sections of bamboo tubes, hollow stems, drilled wood blocks (3/16″-3/8″ holes, 3-5″ deep), and pinecones inside a wooden frame or terracotta pot. Mount 3-4 feet off the ground facing south or east. Solitary bees, lacewings, and ladybugs use these for nesting. Integrating nature-focused activities engages children while supporting local ecosystems.
Compost bins turn yard waste into soil amendment. A simple three-bin system built from pallets or wire fencing handles most household volume. Layer brown materials (dried leaves, cardboard) and green materials (grass clippings, kitchen scraps) in roughly 3:1 ratio by volume. Turn weekly, keep moist as a wrung-out sponge. Finished compost appears dark and crumbly in 3-6 months.
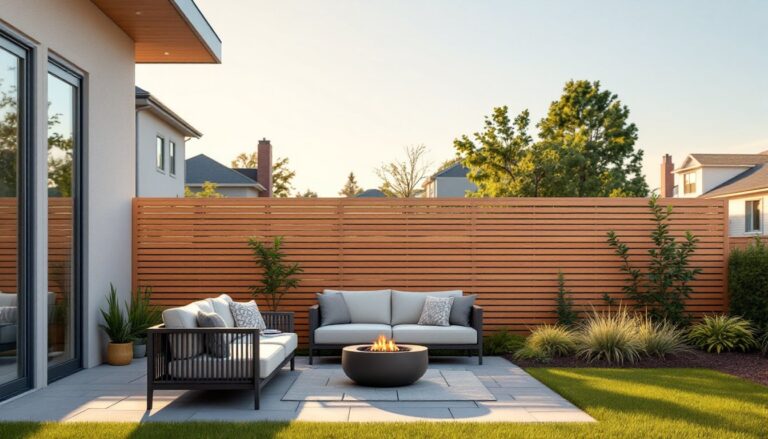
Outdoor Dining and Entertainment Zones
Dedicated dining and entertainment spaces extend living areas and increase home value. Most setups require level ground and basic construction skills.
Patio bases need proper foundation work. For a simple gravel patio, excavate 6-8″ deep, compact the soil, add 4″ of crushed gravel base, then 2″ of sand. Screed the sand level using a notched 2×4 dragged across guide rails. Lay pavers in desired pattern, sweep polymeric sand into joints, and mist to activate. Skip the sand compaction step and pavers will settle unevenly within a season.
Pallet furniture transforms free or cheap materials into functional seating. Sand thoroughly, commercial pallets accumulate grime and splinters. Assemble sofas by stacking pallets for outdoor entertaining two-high for seat depth, securing with metal brackets or lag screws. Add backs by standing pallets vertically. Finish with exterior stain or paint and weather-resistant cushions.
Shade structures make spaces usable during peak sun. A basic pergola requires four 6×6 posts sunk 24-30″ into concrete footings (check frost depth for the region, posts must extend below frost line to prevent heaving). Span posts with 2×8 or 2×10 beams, then top with 2×6 rafters spaced 16″ on center. The materials run $400-800 depending on lumber choice and size. This is a weekend project for two people with intermediate skills. For adjustable shade, drape outdoor fabric, bamboo screening, or weatherproof curtains across the rafters.
Outdoor kitchens start simple. A basic setup includes a drop-in propane grill set into a countertop built from concrete block base and tile or stone top. Add a small refrigerator rated for outdoor use (indoor models fail quickly in weather). According to Better Homes & Gardens, homeowners who plan their layouts around the work triangle, grill, prep surface, and storage, create more functional cooking zones. Run a GFCI-protected electrical circuit for appliances: this requires a licensed electrician in most jurisdictions.
Lighting extends usability after dark. String weatherproof Edison-style bulbs between posts or trees using 14-16 gauge outdoor extension cord. For permanent installations, run low-voltage landscape lighting (12V systems are DIY-friendly and don’t require permits). Solar options work but provide limited brightness, fine for ambiance, inadequate for task lighting.