Table of Contents
ToggleWater bills climbing? Lawn care eating up your weekends? Xeriscaping might be the solution hiding in plain sight. This landscaping approach slashes water usage by 50-75% while creating a <a href="https://thefolkremedy.com/backyard-wedding-setup/”>backyard that’s anything but boring. Forget brown gravel lots, today’s xeriscapes blend native plants, strategic hardscaping, and smart design to build outdoor spaces that thrive in drought conditions. Whether dealing with water restrictions or just tired of dragging hoses around, these backyard xeriscape ideas deliver function, beauty, and serious water savings.
Key Takeaways
- Backyard xeriscape ideas reduce water usage by 50-75% while cutting maintenance time, lowering water bills by 40-60% over 5-10 years.
- Effective xeriscaping relies on water zoning, soil improvement with compost and sand, and plant grouping to match local climate conditions.
- Select native plants adapted to your region’s rainfall and temperature, along with low-maintenance succulents and cacti that require zero supplemental water once established.
- Use hardscaping materials like decomposed granite, gravel, and flagstone to provide structure while reducing irrigated planting areas to 50-60% of total yard space.
- Proper soil preparation with landscape fabric and appropriate mulch (crushed rock for succulents, bark chips for perennials) is critical for long-term xeriscape success.
- First-year establishment watering is essential, but established xeriscape plants need water only during extended droughts, making them ideal for drought-prone regions and water restrictions.
What Is Xeriscaping and Why Should You Consider It?
Xeriscaping comes from the Greek word “xeros” (dry) and refers to landscaping designed to minimize or eliminate irrigation. It’s not about turning yards into desert wastelands, it’s about choosing plants and materials suited to local climate and rainfall.
The benefits stack up fast. Most homeowners see water bills drop 40-60% after converting to xeriscape designs. Maintenance time shrinks too, no weekly mowing, less fertilizing, minimal pest control. In regions with water restrictions or drought-prone climates (think Southwest, California, Texas), xeriscaping isn’t just smart, it’s often necessary.
Structurally, there’s nothing complicated. No permits required unless digging near utilities or installing retaining walls over 4 feet tall (check local codes). Most xeriscape projects are purely cosmetic and well within DIY range, though grading issues or large boulder placement might need a landscape contractor with equipment.
One heads-up: initial costs can run higher than sod and sprinklers. Quality decomposed granite, boulders, and mature native plants aren’t cheap. But amortize those costs over 5-10 years of water savings, and the math works out. Plus, many municipalities offer rebates for removing turf and installing drought-tolerant landscaping.
Design Principles for a Beautiful Xeriscape Backyard
Good xeriscape design follows seven core principles, but three matter most for backyard projects: water zoning, soil improvement, and plant grouping.
Water zoning means grouping plants by their irrigation needs. Put higher-water plants (vegetables, a few flowering perennials) near the house where hose access is easy. Place zero-water natives and succulents in outlying areas. This prevents overwatering drought-lovers and underwatering everything else.
Soil improvement is non-negotiable. Most xeriscape plants need excellent drainage. If soil is heavy clay, amend planting areas with coarse sand and compost at a 1:1:1 ratio (native soil:sand:compost). For severe drainage issues, consider berms or raised beds 8-12 inches high.
Plant grouping (also called hydrozoning) clusters species with similar water, sun, and soil needs. Don’t scatter plants randomly, it forces inefficient watering and creates maintenance headaches.
Start with a scaled drawing. Graph paper works fine: quarter-inch scale (¼” = 1′) is standard for residential yards. Mark existing structures, utilities, sun exposure (morning vs. afternoon), and drainage patterns. Identify where water pools after rain, those are prime spots for dry creek beds or rock gardens.
Think in layers: ground covers, mid-height perennials and shrubs (2-4 feet), then accent plants or small trees. This creates visual depth without irrigation demands. Avoid symmetry, staggered, naturalistic groupings look better and feel more organic when designing a backyard outdoor entertaining area.
Best Drought-Tolerant Plants for Your Xeriscape Garden
Plant selection makes or breaks a xeriscape. Choose wrong, and it’s a maintenance nightmare. Choose right, and the yard practically runs itself.
Native Plants
Native plants are the backbone of any xeriscape. They’ve adapted to local rainfall, temperature swings, and soil conditions over thousands of years. Once established (usually 1-2 growing seasons), most need zero supplemental water.
For the Southwest: desert marigold (Baileya multiradiata), penstemon species, apache plume (Fallugia paradoxa), and desert willow (Chilopsis linearis). In California: California poppy, ceanothus (California lilac), manzanita, and toyon. Texas: black-eyed Susan (Rudbeckia hirta), cedar sage (Salvia roemeriana), texas ranger (Leucophyllum frutescens), and yaupon holly.
Pacific Northwest folks aren’t off the hook, summers are dry. Try Oregon grape (Mahonia aquifolium), kinnikinnick (Arctostaphylos uva-ursi), and camas (Camassia quamash).
Buy from local nurseries specializing in natives. Big-box stores often stock cultivars bred for different climates. Check plant tags for actual water needs, “drought-tolerant” can mean anything from zero water to weekly soaks, and home improvement retailers often don’t distinguish clearly.
Succulents and Cacti
Succulents and cacti offer sculptural interest and literally zero water once established. They’re not just for desert climates, many tolerate cold down to USDA Zone 5.
Top performers: agave species (watch the sharp tips, plant away from walkways), sedum varieties (especially ‘Autumn Joy’), hens-and-chicks (Sempervivum), ice plant (Delosperma), and prickly pear (Opuntia). For height and drama, ocotillo (Fouquieria splendens) and golden barrel cactus (Echinocactus grusonii) work in warm zones.
Planting tip: dig holes twice as wide but no deeper than the root ball. Succulents rot if planted too deep or in poorly draining soil. Top-dress around plants with ¾-inch crushed rock, it sheds water away from crowns and suppresses weeds.
Cold-climate gardeners should focus on hardy sedums and sempervivums. They’ll survive Zone 4 winters and thrive in gravelly, well-drained soil.
Space plants appropriately, overcrowding invites fungal issues. Most drought-tolerant perennials spread 18-36 inches at maturity. Leave room, or plan to divide every 3-5 years.
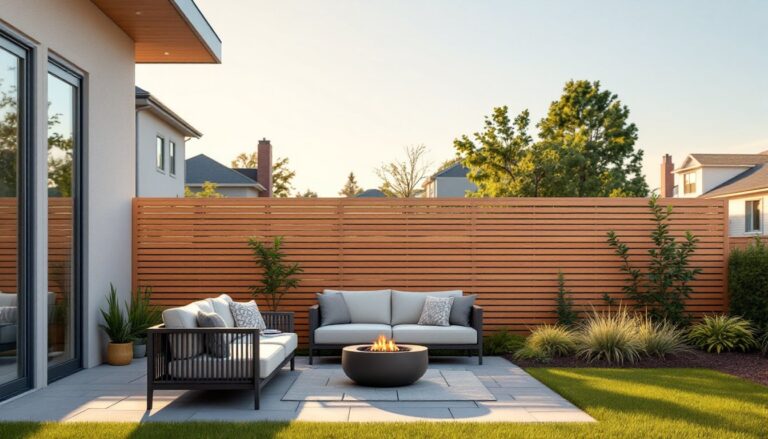
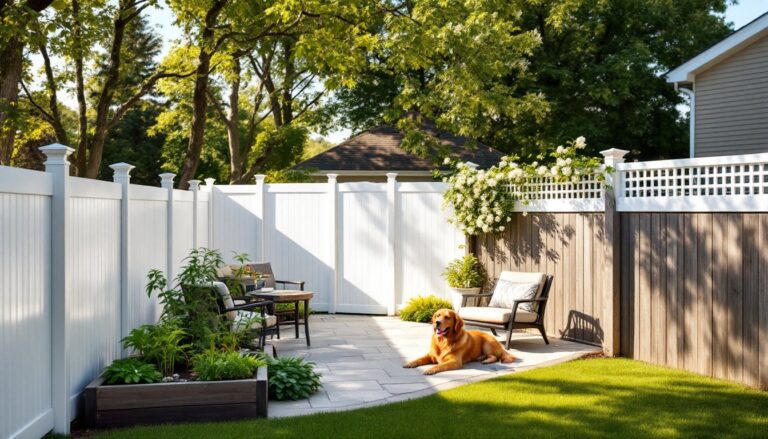
Hardscaping Elements to Enhance Your Xeriscape
Hardscaping does heavy lifting in xeriscapes, providing structure, reducing planted area, and eliminating irrigation zones entirely.
Decomposed granite (DG) is the workhorse material. It compacts into a firm, permeable surface ideal for paths and patios. Expect to pay $40-80 per ton: a 200-square-foot patio needs roughly 2 tons at 3-inch depth. Lay it over landscape fabric to prevent weed growth, wet it, then compact with a plate compactor (rent for $60-90/day). Stabilized DG contains binders that resist erosion better than natural DG.
Gravel comes in countless sizes and colors. Use ¾-inch to 1½-inch river rock for general groundcover, it doesn’t compact like pea gravel, which migrates everywhere. Darker colors (charcoal, black lava rock) absorb heat: lighter tones (tan, buff) reflect it. That matters if you’re creating a backyard entertainment area, dark gravel near seating can be uncomfortable in summer.
Flagstone and pavers create formal or rustic patios. Dry-laid flagstone over DG base works for most applications: no mortar needed. Leave ¼-½ inch joints and sweep DG or polymeric sand into gaps. For heavy-use areas, set pavers in 1-inch mortar bed over 4-inch compacted gravel base.
Boulders add instant maturity. Local stone looks natural and costs less (no long-distance shipping). A 3-foot boulder weighs 800-1,200 pounds, moving it requires a skid-steer or three strong backs and a lot of patience. Bury the bottom third for stability and a natural look.
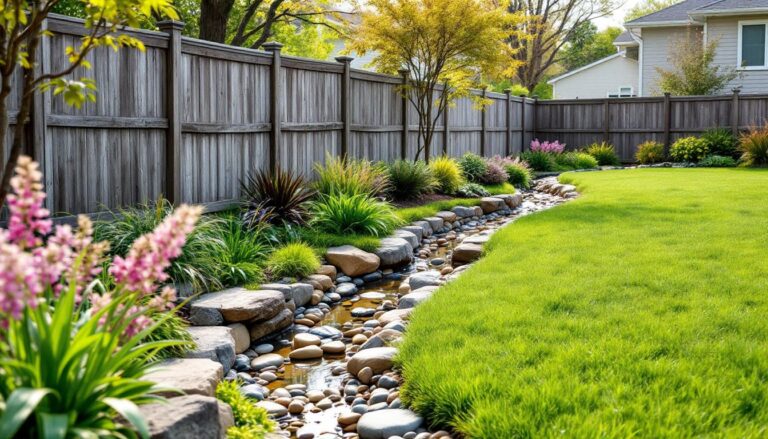
Dry creek beds solve drainage and aesthetics simultaneously. Dig a shallow swale 8-12 inches deep, line with landscape fabric, then fill with river rock graduating from 4-6 inch boulders on edges to 1-2 inch cobble in the center. During storms, water flows through: the rest of the time, it’s a design feature.
Retaining walls might be necessary if the yard slopes. Segmented block walls under 4 feet typically don’t need permits, but check local building codes. Anything taller, or any wall holding significant load, needs engineered plans and probably a contractor.
Keep hardscape proportions balanced. Too much rock, and the yard feels barren. Aim for 40-50% hardscape, 50-60% planted area for visual interest, especially if you want to incorporate backyard entertaining ideas later.
Mulching and Soil Preparation Tips
Mulch is critical in xeriscapes, it moderates soil temperature, suppresses weeds, retains what little moisture is available, and prevents erosion.
Organic mulches (shredded bark, wood chips) break down over time, improving soil. Inorganic mulches (gravel, crushed rock) last indefinitely but don’t feed the soil. The choice depends on plants and aesthetics.
For planted areas with natives and perennials, use 2-3 inches of shredded bark or wood chips. Don’t pile mulch against plant stems, leave a 2-inch gap to prevent rot. Replenish annually as it decomposes.
Around succulents and cacti, use ¾-inch to 1-inch crushed rock or decomposed granite. Organic mulch holds moisture against succulent crowns, inviting rot. Rock mulch sheds water and suppresses weeds without moisture retention.
Soil prep matters more than plant selection. Even drought-tolerant plants need decent soil for the first year while roots establish.
Start by testing soil. DIY kits from garden centers work fine, look for pH and basic nutrient levels. Most xeriscape plants prefer slightly acidic to neutral soil (pH 6.0-7.5). Heavy clay or compacted soil needs amendment. Mix in 2-3 inches of compost and coarse sand (not play sand, it compacts) to improve drainage.
For individual planting holes, dig twice as wide as the root ball but no deeper. Roughen hole sides with a spade, smooth sides can prevent roots from spreading (glazing effect).
After planting, water thoroughly to settle soil. Then reduce watering frequency immediately. The goal is deep, infrequent watering to encourage deep root growth. Shallow, frequent watering keeps roots near the surface, making plants dependent on irrigation.
During the first growing season, water weekly if there’s no rain. Second season, every two weeks. After that, most established xeriscape plants need water only during extended droughts (3+ weeks without rain).
One more thing: don’t skip landscape fabric under gravel. Commercial-grade woven fabric (not plastic sheeting) blocks weeds while allowing water and air penetration. Overlap seams 6 inches and secure with 6-inch landscape staples every 3 feet. Cheap fabric degrades in 2-3 years: quality fabric lasts 10-15.
The initial setup takes effort, there’s no shortcut to proper soil prep and plant placement. But once it’s in, a xeriscape practically takes care of itself. No mowing, minimal pruning, almost no watering. That’s the point.